
Working with clay is a transformative experience, taking raw earth and shaping it into something beautiful and functional. But to do this, potters rely on a range of tools, each with its own purpose and magic. Whether you’re a beginner or a seasoned potter, understanding these tools can enhance your pottery practice. Let’s dive into the essential tools you’ll find in a pottery studio and how they can be used to create your next masterpiece.
 The Potter’s Wheel
The Heart of the Studio
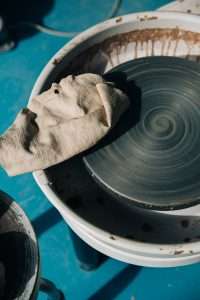
The potter’s wheel is perhaps the most iconic tool in the studio. It’s where the magic happens, transforming a lump of clay into a perfectly symmetrical pot. Wheels can be electric or kick-operated, but both serve the same function: spinning the clay so you can shape it with your hands and other tools.
How to Use:
- Centering: Place the clay in the center of the wheel and use your hands to shape it into a symmetrical mound.
- Throwing: As the wheel spins, use your hands to pull the clay up and out, forming the walls of your pot.
- Shaping: Use fingers or specialized tools to refine the shape and add details.
Clay Cutters and Wires
The First Step in Pottery
Before you can work on the wheel, you need to prepare your clay, and that’s where clay cutters and wires come in. These tools are used to cut large blocks of clay into more manageable pieces.
How to Use:
- Cutting: Use the wire cutter to slice through large blocks of clay.
- Portioning: Ensure each piece is the right size for your project.
Rib Tools
Smoothing and Shaping
Rib tools are flat, usually rounded pieces made from wood, metal, or plastic. They’re used to shape, smooth, and compress the clay during and after throwing.
How to Use:
- Smoothing: Use a rib to smooth the surface of your clay while it’s on the wheel.
- Shaping: Gently press the rib against the clay to refine its shape.
Sponges
A Pottery Essential
Sponges are used throughout the pottery process to keep the clay moist and to smooth surfaces. They can be synthetic or natural, and each type has its own benefits.
How to Use:
- Moistening: Keep your clay hydrated by periodically sponging it with water.
- Smoothing: Use a damp sponge to smooth the surface of your piece.
 Needle Tools
Precision and Detail
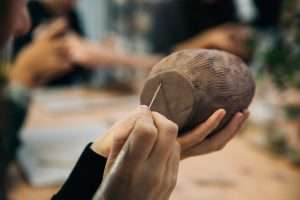
Needle tools are sharp, pointed instruments used for fine details and trimming. They’re essential for scoring, piercing, and carving clay.
How to Use:
- Scoring: Rough up the surfaces of clay pieces you want to join together.
- Trimming: Clean up edges and remove excess clay.
- Detailing: Add intricate designs or pierce holes for decoration or function.
Loop and Ribbon Tools
Carving and Hollowing
Loop and ribbon tools are used to carve out clay and refine shapes. They have a metal loop at the end and come in various sizes.
How to Use:
- Carving: Remove clay to create texture or patterns.
- Hollowing: Make your pieces lighter by hollowing out thick areas.
Brushes
Finishing Touches
Brushes in a pottery studio are used for applying slip (liquid clay), underglaze, and glaze. They come in different shapes and sizes for various tasks.
How to Use:
- Slip Application: Use brushes to apply slip for decoration or to join pieces.
- Glazing: Apply underglaze or glaze smoothly and evenly.
 Trimming Tools
Final Refinements
Trimming tools are used once your piece is leather-hard (partially dried) to refine the shape, create foot rings, and smooth surfaces. They come in various shapes, often with metal ends.
How to Use:
- Foot Rings: Trim the base of your pots to create a foot ring.
- Smoothing: Remove any unevenness from your piece.
Calipers
Measuring for Perfection
Calipers are adjustable tools used to measure the diameter of pots, especially when making lids and matching sets.
How to Use:
- Measuring: Ensure the dimensions of your pieces are consistent.
- Matching: Use calipers to create lids that fit perfectly.
The Pugmill
Recycling and Mixing
A pugmill is a machine used to recycle clay scraps and mix clay to a uniform consistency. This is especially useful in larger studios where sustainability is a priority.
How to Use:
- Recycling: Combine scraps of clay and feed them into the pugmill to be mixed and de-aired.
- Mixing: Ensure a consistent texture for all your clay.
The Kiln
The Final Stage
The kiln is where your pottery pieces are fired to become hard and durable. There are different types of kilns (electric, gas, wood-fired), each with its own firing process.
How to Use:
- Bisque Firing: The first firing, which hardens the clay so it can be glazed.
- Glaze Firing: The second firing, which fuses the glaze to the pottery.

Final Notes
Each tool in the pottery studio has a specific role, contributing to the creation of beautiful ceramic pieces. Understanding and mastering these tools allows potters to fully explore their creativity and bring their visions to life. Whether you’re just starting out or are a seasoned artist, the right tools can make all the difference in your pottery journey.
Have any questions or want to learn more? Feel free to reach out to us on Instagram or ask one of our knowledgeable teachers during a pottery class or workshop. Happy potting!